FUYANG 40KHz 88L Four Tank Automotive Ultrasonic Cleaner For Car Engine Parts
The process of cleaning your parts is actually very simple once you have everything you need:
1.) Get Your Sonic Cleaner Ready – Fill your ultrasonic unit to the “fill line” with hot, clean water. Next, add your cleaning concentrate to around 10% concentration. This can be adjusted up or down depending on how dirty your parts are. Insert your cleaning basket, and let the unit run empty for a cycle or two. This will allow the tank to come to temperature, as well as “de-gas” the cleaning solution.
2.) Clean Your industrial Metal Parts – First, place your metal parts into the cleaning basket. Make sure your parts are arranged in such a way that they are completely submerged when lowered into the cleaning tank. Once the basket and parts are in the tank, choose your cycle time (if applicable) and hit go! In general, it shouldn’t take more than 5 to 10 minutes to fully clean your parts. Once the cycle is completed, remove your parts from the basket, and allow to air dry, or if available, blow dry.
TIP: Your tank of ultrasonic cleaning solution can be used more than once! A good indication of when you need to replace your solution with a new batch is when cleaning time begins to increase to acheieve the same result.
3.) Ultrasonic Relubrication – Using an ultrasonic parts washer to re-lubricate your bike parts may sound far fetched, but the process is quite simple. First, have your ultrasonic cleaner ready with a tank of clean, hot water, filled to JUST UNDER the fill line. Next, place around 2 to 3 inches of lubricant in your lube pan, then place the lube pan in such a way that the bottom inch of the lube pan is submerged around an inch or so in the tank water. Many “solid trays” have flanges on the side to facilitate this purpose. Finally, run your ultrasonic unit as normal, as if you were cleaning parts.
The way this works is that ultrasonic energy will actually pass through the tank of water, pass through the bottom of the lube pan, and into the lubricant within, thus sonifying it. The same process that cleans even microscopic nooks and cranies will now shove lubricant into those same areas!
After a full cycle, remove your parts from the lube pan, and allow them to drip access lubricant back into the pan. Finally, wipe any remaining lubricant from your parts, as over lubrication can attract abrasive soils over time.
Whatever cleaning schedule you set up, you’ll find that the life of your bike is extended, and you’ll get more hours of trouble-free riding by ke
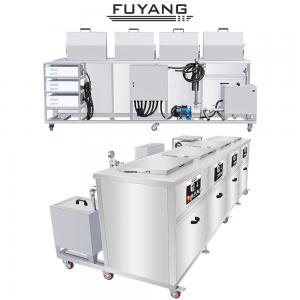
| Specifications for ultrasonic cleaner F-4024 |
| Model |
F-4024 |
| Each Tank capacity |
88L |
| Tank Quantity |
Four |
| Each Tank size |
550*400*400mm |
| Tank material |
SUS304 |
| Ultrasonic power |
1200W |
| Heating power |
3000W |
| Timer |
1-99h adjustable |
| Heater |
0-95c adjustable |
| Frequency |
40khz |
| Control |
Outside generator, more stable |
| Voltage |
380V, 3phases |
| Warranty |
1 year |
| Packing |
1unit/wooden case |
| Cleaning Process |
Ultrasonic Cleaning+Ultrasonic Rinsing+filtration+Drying+dehydration |